Showing posts with label Blog. Show all posts

Wednesday, July 8, 2015

Recipe and Technique: Marinating and Chopping Your Own Carne Asada

A few years ago, I was lost in the vast depths of the internet.  There, I came across a video recipe for carne asada. To my surprise, the chef added oranges to his marinade. I had to pause the video and rewatch it a few times as well as make sure my translation of narajanas was indeed oranges.

I started asking some of my coworkers about the legitimacy of this recipe. Sure enough, they all replied unanimously with agreement. They said that it helps bring out the flavor as well as make the meat more tender. I could understand the flavor component, but I had to disagree with the latter.

It is true that some fruits have a tenderizing agent in the form of enzymes, such as pineapples or kiwis, but acidity alone does not "break down" anything in meat. Instead, the tender consistency of carne asada comes from two entirely different concepts: the specific cut of beef and the chopping of the meat.


(This photo is not mine. I found it on google. I forgot to take pictures of the post-chop meat product, and I'm saving my pictures of another post. Forgive my noob moment.)

On my last visit to my local carniceria, I asked the butcher for his opinion on the best cut of beef to use for carne asada because I saw both marinated ranchera and chuck roll on sale. His personal preference is chuck roll (thinly sliced beef chuck shoulder) because it contained more fat and is juicier. However, ranchera (flap meat) is the traditional cut to use. So why not have the best of both worlds?

After marinating and cooking, I decided to chop the beef into small bits, much like how it is served at Mexican restaurants. My family originally cut the meat into larger strips and pieces simply because it was easier to do. Besides, larger pieces of meat should give a better mouth feel, like eating a piece of grilled steak. Turns out, the high collagen content in these cuts give the meat quite a chew to put down. By chopping up the steak, the tough mouthful works in our favor by not letting the chopped meat taste like ground meat (the "ready to fall apart and crumble" texture). 

After tasting the carne asada, I've come to the conclusion that the orange and lime marinade worked in perfect unison with the texture of the chopped meat. This was accomplished by the slight "pucker" reaction I had when chewing. Imagine yourself eating your favorite sour candy: war heads, sour pop, and all the other childhood favorites. The sour candy is some how able to elicit a "succulent" taste on your tongue. I believe that this same thing is happening with carne asada. The tough chew, chopped consistency, and fragrant lime and orange marinade all come together to help create this feeling that the meat you are eating is incredibly juicy. Or maybe I'm just crazy for thinking so.

Ingredients:
1 lb Beef Ranchera 
1 lb Beef Chuck Roll
1 Orange
2 Limes
1/2 Onion
Cilantro
1 tsp Cumin
2 tsp Oregano
Salt and Pepper

DO's:
-If you have a tin of chipotle peppers, add in one or two into the marinade!
-Use any proportion of beef cuts! I used a 1:1 ratio of beef chuck and ranchera. Beef chuck was half the price/pound, so it is definitely a budget cut!
-If you're unable to get thinly sliced beef chuck roll, cut your own! You're looking for 1/2 inch slices, which is fairly easy to do without exact knife skills.
-Use a grill if you can! It makes the meat so much better! But if you don't have the time, just sear it on a skillet. I used a cast iron skillet for this recipe.
-Reduce the amount of orange and lime to your own taste.

DON'Ts:
-Use too much lime and orange. I used one whole orange and two limes for a little less than 1.5 pounds of beef. It actually became overwhelming!


The Marinade

You can layer your ingredients or just toss everything into a zip loc bag. It really doesn't matter!


I decided to layer my ingredients to make it fancy. I wouldn't do it again though, it didn't make a difference.


Make sure to marinade this for at least 1 hour! No more than 5 hours!


I was too lazy to set up my charcoal grill, so this cast iron pan will do the trick for me. Make sure you get that delicious sear on your meat. I have here two steaks of ranchera sizzling away.

Honestly, the marinated meat cost the exact same as the unmarinated variety. I would only do this if I had a specific flavor I had in mind, different from the ones available in store. It was definitely worth the experience though. So the next time you show up to a BBQ, bring a giant zip loc bag of carne asada with you. You can never go wrong if you do!


Saturday, March 28, 2015

The Meat Primer Volume 2: Pork Ribs

Ribs are one of my favorite pieces of meat to cook. They're the ultimate finger food, make for great stews and curries, and are easily accessible in any local grocery mart. They're an incredibly delicious cut of meat and extremely affordable to buy.

The only problem is that they're quite hard to cook properly if you don't have the right technique. So in this volume of The Meat Primer, we're going to talk about pork ribs. In specific, we're going to talk about how to make the perfect slab of pork spare ribs or baby back ribs.


Anatomy
Before we start cooking ribs, we need to take a look at why cooking ribs are so difficult. The rib cage of all animals serves to protect its inner organs and to facilitate respiration. By expanding and contracting, a rib cage acts as a vacuum for its lungs. This continuous process attributes greatly to why the meat in between ribs is so tough and stringy.

Ribs are laced with an abundance of connective tissue. But wait! I'm talking about the same type of connective tissue that melts and becomes gelatin! This should automatically fire off alarms that ribs are the perfect candidate for braising. In Asian cultures, braised spare ribs are plentiful in many dishes, such as curry. If you've been having trouble cooking ribs in the past, this may be exactly why they are not fork tender. Ribs need time. Low and slow heat with many hours of roasting and braising is definitely the go-to method for cooking ribs.


Lastly, the underside of ribs all have a thick, leathery membrane that will not dissolve no matter how long you cook it. This membrane is called silver skin. Feel free to eat it, but most recipes will call for the removal of the silver skin. To do this, insert the back end of a spoon in between the rib meat and silver skin. Slowly pry away the skin, and remove any pieces remaining.


Cooking Methods
Since we have already established the fact that ribs need time to break down and become fork tender, let's talk about the more intricate methods of cooking ribs. For example, if we must braise ribs, how do such dishes as barbeque smoked spare ribs or baby back ribs exist? It's generally a crime to boil ribs in water and then stick them back into the oven or smoker (it removes all the flavor from the meat)! To do so, we're going to introduce a method called the Texas Crutch.

First, let's establish our goals when roasting ribs. We aim to:
-Achieve tender "fall apart" perfection
-Achieve the Maillard Reaction
-Use proper seasoning in forms of rub or sauce

We can reach all of these goals in one simple process. The Texas Crutch is a barbeque smoking technique developed to bring tough cuts of meat up to ideal temperature without exposing the meat to too much heat and smoke. It was developed using cutting edge technology and done by wrapping the meat up in parchment paper or foil with a small amount of liquid after the first 2-3 hours of smoking. The meat will continue to cook for another 1-2 hours, before finishing up on a high heat grill.

Finishing ribs on high heat will add a seared crust to finish, as well as caramelize any sauces added (usually multiple layers of sauce). By searing the meat at the end, we are performing a reverse-sear method to induce the Maillard Reaction.


Wait a second...isn't that...braising...?

The Texas Crutch is exactly that. It is a simplified and reduced method of braising. But don't ever say that to a BBQ Pit Master. There's at least some technique involved!

There are many variations of how to use the Texas Crutch in cooking ribs, but it needs to be used at one time or another. Each variations will depend on what tools you have available and if you're willing to go the extra mile in cooking delicious and succulent ribs.

Variations Of The Texas Crutch
To make a slab of ribs in your home, all you need is an oven. But of course, we can do better than that can't we? Here are two examples for pork baby back ribs.

With only a oven:
-Wrap slab of ribs with foil as if it were a boat
-Add 1/2 cup of water or broth into the wrapped package
-Seal and roast for 1 hour 30 minutes at 350 °F
-Remove from foil and finish ribs off by using a broiler.

With an oven and a grill:
-Wrap slab of ribs with foil as if it were a boat
-Add 1/2 cup of water or broth into the wrapped package
-Seal and roast for 1 hour 30 minutes at 350 °F
-Remove from foil and finish ribs off on the charcoal grill

Without a grill, the first method is only able to sear the meat at the very end with the use of a broiler. Even so, oven broilers are usually uneven, and do not create a perfect sear.

Using a charcoal or propane grill has many benefits on top of the oven-only method. The high concentration of heat is able to induce the Maillard Reaction after the ribs are finished in the oven. It also serves to help dry and crisp up the surface of the meat and better caramelize any sauces we choose to use. If using a charcoal grill, we can infuse some delicious smokey flavors and the end product is absolutely delicious.

Both of these methods will produce incredibly juicy and tender ribs. But if you can go the extra mile and use the charcoal grill, I guarantee the ribs will be just that much better. 


Shown above, I added about half a cup of water into the wrapped up ribs. Place your ribs meat side down, and pour the liquid on the top half. For better results, try using apple juice or chicken broth!

Seasoning
Seasoning your ribs is based on math. Seriously, math. What we're looking at when dealing with ribs is the fact that they have a high surface area to volume ratio. This means that using a dry rub of seasonings will have more of an effect than using a brine. Marinades won't work either because of the nature of the cooking techniques that using. There is enough connective tissue and fat laced in ribs that proper seasoning is all that is needed to bring out amazing flavors in any cut of ribs. Just make sure not to double salt your meat and any sauces that you end up using on the ribs. 

Before adding our dry rub though, we need some type of adhesive for the seasoning. Besides the high amount of collagen in ribs, the meat is quite flavorless. We need to pack as much flavor as possible onto our ribs, or else they will end up tasting bland. I start by mixing equal parts of mustard and olive oil together and using it as a spread on the ribs before dusting with rub. Mustard is a natural emulsifier of fat, and if you continuously mix the mustard and oil together, you will end up with one single mixture.


This mixture above is actually equal parts Grey Poupon Dijon Mustard and Olive Oil. I was inspired by Alton Brown to give mustard a try, and I must say it produces a huge amount of flavor. A thin coating will be enough to help the dry rub stick.


All that's left to do is to dust and cook! Recipe for baby back pork ribs will come soon!

The Difference Between Baby Back and Spare Ribs
Simply put, they come from different sections of the rib. Baby back ribs are closes to the tenderloin, but are much smaller. In theory, baby back ribs are more tender and juicier. But if we cook spare ribs correctly, I believe they yield a better final product. Spare ribs have more meat, are cheaper to buy, and when bitten into, feel more like ripping into a large chunk of meat. 

The only drawbacks of using spare ribs are their massive size and uneven shape. The bones are thicker on one end, leading to uneven cooking times. Sometimes, they won't even fit on your grill or tray! You can remedy this buy splitting the rack in half. It's much easier to handle, season, and cook.

Baby back ribs are easily found in all local markets, but spare ribs in a full slab may be harder to come by. If you are looking to try your hand on spare ribs, look for a specific cut called "St. Louis Ribs". The St. Louis cut of spare ribs is actually a technique of trimming the ribs so that they have a uniform and even rectangular shape. If you don't do this, the bottom of the spare rib will come with a large bone and some awkwardly placed flabby pieces of meat. They don't exactly cook well, and it's best to remove them and save them for stock.

This Is Not Barbecue 
Barbecue, or BBQ, is a completely different technique of cooking ribs, pulled pork, brisket, and etc. We have barely scratched the surface of what BBQ means, and I will delve into the subject soon. However, this does not stop us from creating finger-licking good ribs at home! 

Stay tuned for my personal dry rub, BBQ, and baby back rib recipes!

Monday, March 16, 2015

The Meat Primer Volume 1

Welcome to my collective series dedicated to: Meat


Two freshly trimmed cuts of beef tenderloin, USDA Choice.


Volume 1: Basics and Food Science
1) Introduction
2) Searing Your Meat: The Maillard Reaction
3) Rare, Medium, and Well-Done
4) The Conversion of Collagen to Gelatin
5) How Meat Actually Cooks: Outside In
6) Introducing Indirect Cooking 

*This primer is an introduction to what you're actually doing when you cook meat. There are many more detailed guides available and more qualified individuals to look to about the topic of meat science, but I hope to simplify and compile all of that knowledge to an easily accessible source. Most of what I have learned, I have learned from others and hopefully I can share that with everyone reading this blog. Most of this volume will consist of meat science.*


1) Introduction:
I ran into the most trouble cooking during my third year of college. I always knew my way around the kitchen and can follow a recipe, but I didn't exactly know what I was doing. Why did my pot roast not become fork tender? I marinated this chicken overnight, but it still tastes bland! My ribs are so stringy and tough!

Most recipes available are actually designed for an intermediate chef. Even my own recipe entries are written without a step by step guide. Chop your veggies, season, saute, add your meat, sear, simmer, and etc. They are incredibly simplified and state only what you need to know to cook the dish. If they were to explain the reasoning for every single step of the cooking process, recipes would be essays! Why am I supposed to take out the chicken breast half way through searing and finish it in the oven? What does that do? Can I do it differently? With this meat primer, I aim to fill in the missing dots.

Ultimately, cooking boils down to Food Science. I researched for hours on end to create amazing BBQ and I learned a vast amount of information along the way. For example, you can break down collagen in tough meat cuts to create gelatin. You can find this gelatin anywhere! For example, if you have ever refrigerated food, some of the juices/sauce seem to become a solid gelatin. Taking inspiration from such individuals as Alton Brown, I present to you a simplified version of this food science: The Meat Primer. In this first volume, we're going to talk about the general techniques of cooking meat and what they are actually doing.


2) Searing Your Meat: The Maillard Reaction
Every cook talks about introducing color on your meat. Essentially, we are aiming to produce the Maillard Reaction, which consists of a series of reactions that happens when meat is seared and browned with high heat. It's the difference between eating boiled, grey looking beef and cutting into a seared rib eye steak, with a savory and flavor packed crust.

We're not talking just about incorrectly cooking meat either! Look at the difference between a cut of prime rib and rib eye steak. They are the exact same cuts of meat but cooked differently. Prime rib, known for being extremely succulent, is served with au jus on the side to dip with to enhance flavor and add extra seasoning. This is achieved by roasting a rib roast whole, allowing the meat to slowly come up to that perfect medium-rare temperature. Pan-seared, grilled, or charbroiled rib eye steak takes full advantage of the Maillard reactions to develop a delicious seared crust all around. The crust adds a crisp texture to the surface, enhances the overall beef flavor of the steak, and is the perfect way to introduce aromatics such as garlic and thyme.

Some more examples of this can be seen in something we call Fond. Fond are the bits and pieces of meat stuck to your pan or pot after cooking. Who would have known that a dish washers worst nightmare is a chef's best friend? Fond can be deglazed with any type of liquid, commonly stock or wine, to produce a complex but amazing base for any soup or sauce.

Searing also creates a wonderful Crust on the surface of the meat that we talked about earlier. This crust has had it's water content squeezed out due to the changes in its proteins, concentrating its flavor. It also helps by trapping water content inside the rest of the meat, essentially sealing it in. Not to mention, makes your steak look absolutely gorgeous and drool worthy.

Short and simple? Sear your meat on high heat when first cooking it. Do not overcrowd your pan or pot, for all those extra items can absorb the much needed heat to induce these reactions, or else you end up boiling your meat.


Before wrapping up this tenderloin for beef wellington, I seared the surface to impart more flavor.


3) Rare, Medium, and Well-Done
We all know what these terms mean. Rare means you're a carnivore, Medium is the safe bet in between the two ends, and Well-Done means you're old and don't want to eat red meat...Wait, maybe we're not talking about the same things here.

These terms refer to the final temperature of meat when cooked, producing different textures and completely changing your dining experience. There's not too much to say here about these terms for they are pretty explanatory, so I'm just going to list some temperatures worth knowing.
Beef:
Rare 130 °F
Medium 140 °F
Well-Done 150 °F

Chicken and Turkey:
Breast 165 °F
Thigh 165-175 °F

Pork:
USDA changed (2011) to minimum temperature to cook pork at 145 °F for Medium Rare


*All ground meats should be cooked to well done. I enjoy eating some beef burgers medium-rare, but do so at your own discretion*


4) The Conversion of Collagen into Gelatin
This bit of knowledge took me a long time to come across, partly because it wasn't well documented until food science became popular. Everyone has come across one of two situations:
-This meat that I'm eating is so tough and chewy. It's not juicy, dry, over cooked, or under cooked!
-I'm just going to microwave my leftovers...Wait a minute, all the sauce turned into jello! What sorcery is this?

Meat is essentially muscle tissue. What is muscle tissue laced with? Connective tissue. In particular, we're talking about a protein called collagen. Collagen is what holds meat together (an over simplification). However, we can break down that collagen! At an estimated 190 °F, collagen undergoes a transformation into a type of gelatin, which is packed with meaty flavor and succulent juices!

Let's rewind for a bit. Meat is considered well-done around 150-160 °F! Essentially, to break down the tough cuts of meat, we have to cook them way passed their desired temperature for medium-rare. How do we prevent burning or drying up? This is why braising was developed (you've never heard of medium-rare braising for a reason).

Braising is a technique in which you cook meat in some amount of liquid for long periods of time. Liquid is a great mediator of heat and provides a very gentle method to raise the temperature in meat well passed their limits on the charts. By using this technique, we can achieve our desired temperature of 190 °F!

Some examples of braising are any slow cooker recipes, cooking pot roast in red wine or beef broth, or any type of stewing that involves tough cuts of meats and many hours. For a moment of clarity, have you ever cooked anything for long periods of time without some type of liquid medium to produce anything "fall apart tender"? The only exception I can think of is controlled temperature smoking for BBQ.

Finally, this conversion process is one of the key techniques in making a great soup. Bones are a prime source of collagen, which is why many soups start with some type of bone product. Pork bones in tonkotsu ramen and beef bones in pho are just two popular examples. The gelatin produced ultimately gives the soup a fuller body and slightly heavier feel. Without this process, we'd just be drinking seasoned water!


Shown above is the secret to Xiao Long Bao (mini soup dumplings). I stewed together pork hocks, chicken feet, and pork belly rinds for hours to produce the gelatin needed to essentially solidify the soup at room temperature. When steamed with the XLBs, they melt and become the delicious, decadent soup that we all love. Future blog post incoming?


5) How Meat Actually Cooks: Outside In
This is an easy concept to grasp. We cook the outside of meat, but the outside of meat cooks the inside of the meat.

Confused? Imagine you are roasting a cut of beef. The recipe asks you to take out the meat 10 degrees lower than the desired temperature. We do this because once you take it out of the oven, the outside crust of the meat is still incredibly hot! It will proceed to continue cooking the inside of the meat whether you like it or not!

An important side note: this process is that this sole reasoning of why I will never stuff my meats with other raw meats for roasting. I will never stuff turkey with actual turkey stuffing (but I will stick an apple, onion, and herbs to add flavor from inside out). By the time your meat is cooked, the inside stuffing is practically still raw! Only stuff your meats with cheeses, herbs, or items that are not particularly dense and need to be cooked.


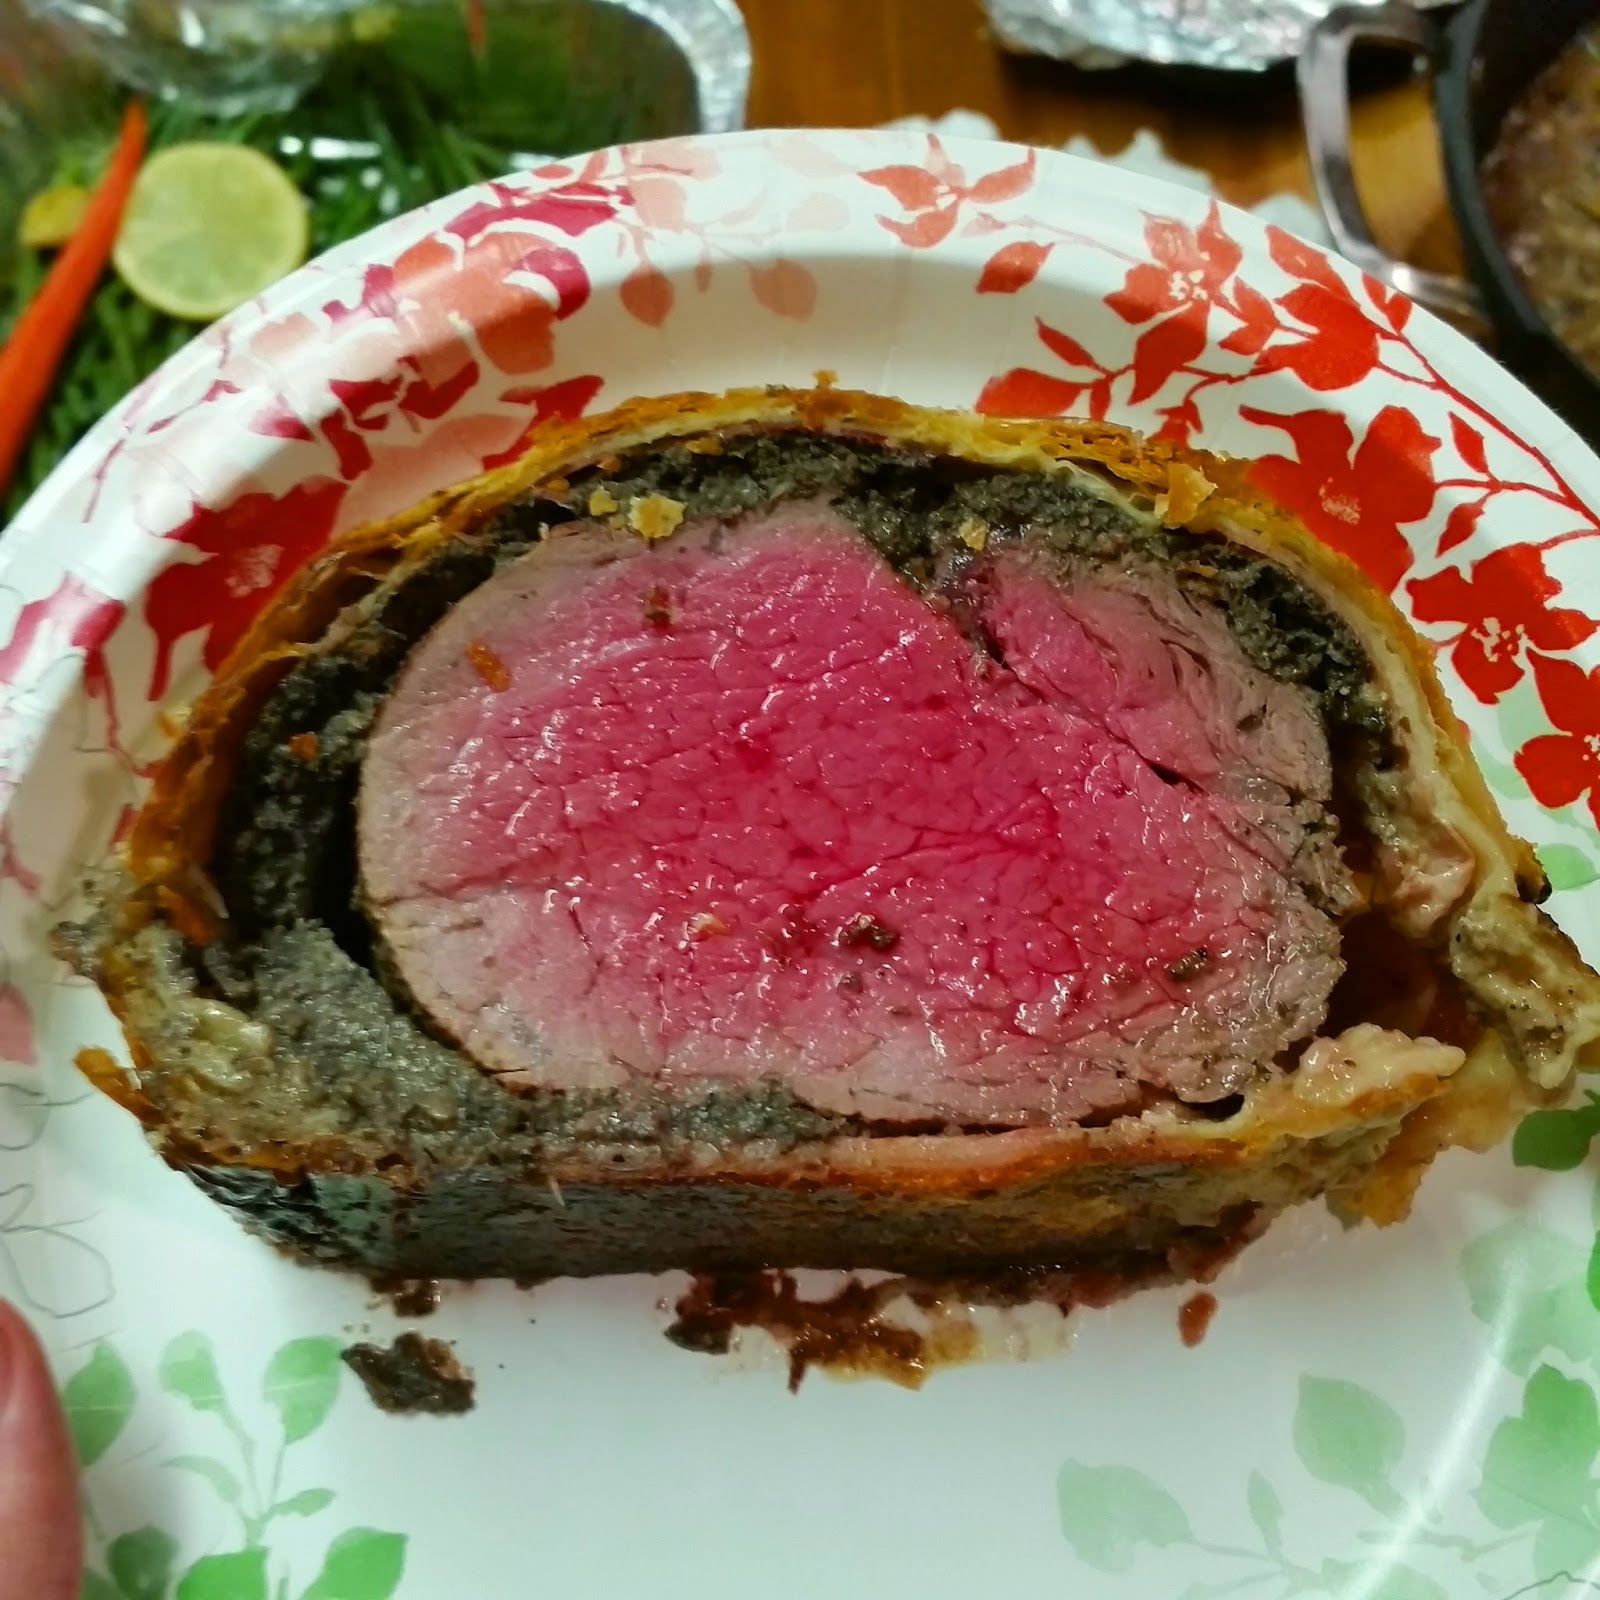
As seen above in this beef wellington, there is a very obvious temperature gradient. The closer you get towards the edge of the meat, the more cooked it is.


6) Introducing Indirect Cooking
One of the great hurdles in cooking the perfect piece of meat is to achieve a great crust, but achieve the perfect medium-rare temperature at the same time. I began to run into a problem with cooking chicken breast. I would create a wonderful sear on the outside, but if I continued to cook the chicken to achieve 165 °F, the outer layers of the chicken breast would be overcooked and incredible tough. 

By using indirect cooking, we now have a solution to our problems! We begin by searing our meat the same way, but we finish cooking by using a more gentle form of heat. For example, with chicken breast, I can add chicken stock into the pan, bring the heat down to low, and cover. You will steam and cook all surfaces of the breast slowly, bringing the chicken to the perfect temperature. Or you can transfer your chicken to a rack, and bake it at 350-400 °F until done. By doing this, we are avoiding the direct heat of the pan.

When using a charcoal grill, place your coals only on 1 side of the grill. This creates 2 zones of heat so you can both sear meat directly over the coals and finish with indirect heat. If using a propane grill, they usually have a top rack raised higher than the main grill. Place meats almost done on the top rack to finish cooking, or just set half of the burners to low (or completely off).

In the near future, I'll be posting about my experiences with BBQ and smoking meats. Smoking meats relies solely on indirect heat, using temperatures no higher than 225 °F, therefore is one of the few exceptions to the methods we talked about in this volume.


Here's an example of indirect cooking with 2 zones on a charcoal grill. It's the basis of making great BBQ. Shown here is one of my first experimental batches of bacon. Pork belly brined with maple syrup and seasonings, smoked over cherry wood.

I've simplified a large amount of material and showed some basic examples here, but hopefully I've enlightened you to different techniques of perfecting meat. I encourage you to research more on the matter for the amount of information available out there is incredibly vast. In the future volumes of this primer, I plan to talk about each type of meat individually, as well as proper marinating and brining techniques. I hope you enjoyed your read at Justin's Kitchen!

Tuesday, March 3, 2015

What's missing in your tomato sauce?

I'm going let you in on some trade secrets for creating an amazing tomato sauce. But what makes a tomato sauce great? Flavor? Sweetness? Aromatics? There always seem to be a missing component, but you can never put your tongue on what is.


Shown above is spaghetti bolognese, a meat sauce using a pomodoro base.

Let's start with the basics
There are two general types of tomato sauce you can make: marinara or pomodoro. To simplify, marinara sauces do not simmer for long periods of time, producing a bright, chunky, and fresh sauce. A pomodoro sauce on the other hand is stewed for hours, developing a different set flavors and textures. For now, we're only going to talk about the latter.

The key to an incredible pomodoro sauce is to not think of it as a sauce, but as a soup. We build the layers of flavors on top of each other in such a way that the body of the sauce becomes more than just stewed tomatoes. Take chicken stock for example. You start with your aromatic vegetables consisting of carrot, celery, and onion. Chicken bones are roasted for more flavor and added to the stock. Herbs are added and the entire pot is simmered to meld all of the flavors together. We are going to do the exact same thing with our tomatoes.

Consistency and Body: The Vegetables
Try eating a spoonful of your sauce. Does it feel watered down? Too thick? One of the things I hate most about tomato sauces is when the water separates from the body of the sauce. This is a common problem when using store bought pasta sauces. Do I still use them? Of course I do, they're incredibly convenient (I do prefer using San Marzano tomatoes though). Even with store bought sauce, I start with the same base every time. Grated carrots, chopped celery, finely diced onions, and lots of minced garlic. After everything has simmered away for a few hours, the vegetables break down and create a wonderful body. I like to enhance this mouthful feeling by adding red or white wine, which adds a small stringent factor to the palate. Plan to simmer the sauce and reduce it until the desired consistency is reached.

Umami: The Meat
A word commonly obsessed over by food critics. The easiest way to add umami to your pot is by adding meat. But wait! If there was one thing I wanted you to take out of this entire lengthy entry, is to try using this:


Don't freak out! I know anchovies have a bad wrap for being just plain weird, but think about the other common sources of umami. Fish sauce is the liquid extracted from fermenting fish and soy sauce is a variety of soy products fermented with mold! If anyone has ever eaten any of the Italian dishes that I have made in the past two years, then you have eaten anchovies. It is the equivalent of using fish sauce as an umami bomb in non-Asian cooking. A large pot can use a whole tin of anchovies as shown above, whereas a small pasta dish made for two people can use just 2-3 filets. I usually add the filets in while I saute the vegetables. Don't forget to use the olive oil in the tin! It's packed with flavor! Just be careful in not over salting your food.

If you haven't tried playing around with stock pots/cubes/powder/bastes, now is the time! Some chicken bouillon does wonders for this type of sauce. In a pinch, chicken broth will do, but will add to the cooking time if there's too much liquid in the pot. We can also sear meat in the bottom of the pot before adding your vegetables in, giving us those lovely meat bits packed with flavor and umami. Any meat will do, just pick! I suggest using any tough cuts with lots of connective tissue, like ribs or shoulder cuts. The collagen will eventually break down into delicious gelatin, providing more body to the sauce and improving the consistency and adding to flavor.  If this is a meatless sauce, then just stick with the anchovies.

Tomatoes: The Red Thing In Your Sauce
As mentioned above, store bought pasta sauce works in a pinch but San Marzano tomatoes are king here. Try it once and you will understand why. They come in whole, dice or puree'd varieties. Pick and choose whichever you like! I would add in the tomatoes after the vegetables have cooked down and become soft. If the batch of tomatoes you're using are a bit tart and sour, a pinch of sugar will do the trick.


Aromatics: The Herbs
I'm partial to adding basil and oregano, but depending on what you want to do with the sauce, you can change it up! Hot pepper flakes, parsley, thyme and etc. Certain herbs should be added right before serving (like parsley), where as others should be stewed. Most recipes will specify when to add what, so don't worry too much about that.

Time: The Waiting Game
I suggest a minimum of 2 hours on simmer. Always remember to taste for seasoning and don't forget about reducing/adding water to the pot. I always do the final taste test before serving. It's always better to under salt at first, than to over salt and try to fix it.


Shown above is an Italian Sunday meat sauce before simmering and reducing. I used a combination of beef shin, pork spare ribs, and Italian sausage for the meat. Don't forget the anchovies!

I never said that achieving a great tomato sauce can be done in 20 minutes. But it definitely is simple! Start with a vegetable base, introduce umami, add aromatics and simmer!

I hope you enjoy this post as much as I have enjoyed writing it!

Monday, March 2, 2015

What better way to start the day than with brunch?

Brunch is one of those things that people make difficult. Brunch is actually the easiest meal to put together. The goal is to keep it fast, simple, and easy. That way you can chat with your friends with that lovely glass of mimosa on the side and not be stuck cooking the whole time.


This past Sunday, I made pan-seared salmon with a strawberry salad, portobello mushroom and french scrambled eggs on top of a baguette. It sounds like a mouthful to just say and it would run you around $15 dollars to order in a restaurant, let alone at least an hour wait on a Sunday just to get in the door.

The actual cost of this plate? About $5 if I did the math correctly. It also took me a total of 1 hour to buy all the groceries, cook, and plate. Luckily, I had the help of my girlfriend so we were in and out of the kitchen in almost no time at all.

One of the best ways to go about planning a brunch menu is to have a balance of all the different flavors and textures, while retaining a fresh and light feel. I would never stop someone from having a juicy cut of prime rib at 11 AM, but I wouldn't call it brunch either. An example of this is the strawberry salad shown above. The creamy tang of goat cheese paired with the sweet crunch of candied walnuts works incredibly well. I created a lime, honey, and olive oil dressing to to have a sweet, sour, and bright contrast to the savory taste of salmon and portobello mushroom. Finally, the French scrambled eggs gave a creamy and fluffy mouth feel to the otherwise robust baguette.

I will post a more detailed recipe to follow soon! Happy brunch making!

Welcome to Justin's Kitchen

Dear friends, family, and readers,

As many of you know by now, I love to cook. I love to cook more than I love to eat and I want to share that with everyone. It's one of my favorite hobbies and seeing the smiles on the faces of others makes every dish worth making. There's just something special about seeing a well planned meal finished exactly the way you wanted it to, or even better!

Everything that I have learned was taught to me by my family or by the wisdom of others (the internet). I must have been 6 years old when I started to make my own scrambled eggs on the stove. Now it's become about nailing that perfect medium-rare filet mignon by using sous vide, or spending two weeks on a cut of brisket to prepare pastrami, making my own smoked maple bacon from pork belly, wrapping up tenderloin for beef wellington,  and stewing tough cuts of meat for hours to create the perfect Sunday meat sauce for homemade tagliatelle.

I am not a trained chef and I blend techniques from all the different cultures of food together. I will never say my dishes are authentic, but I will guarantee that every single recipe I put on here is worth making. I will not blabber about trivial things or how my Aunt sometimes double lane drives in her SUV.

This blog is partly for myself. It is a way for me to track my own recipes and write down everything that I've learned to one day pass on. It will have Do's and Don'ts, substitutions and tips, suggestions and much more.

I will always list all the ingredients I used, but I will not write down exact measurements unless I think it is crucial to the taste. I will never script your kitchen experience by numbering out how you should cook. I will group together steps and and cooking tips together so you can work at your own pace.

Thanks for stopping by and taking a look at my new food blog project! I hope you enjoy what you find here. Please let me know if there's anything you would like to see or read about!

Justin Tsan